emlog 制作一个小插件(截取正文生成 xx 字摘要)的过程
独元殇 • 2022-11-09 20:43 • 1024 次点击 •
如果熟悉其他 PHP 平台的 CMS 系统的话,那么我们会发现 emlog 的插件制作过程是多么的暴力和简单。
当然,对于一些初学者,没有接触过这方面的知识,可能觉得制作某个系统的插件,好像是一件很复杂的事情。
其实并没有。所谓插件,其实就是软件会在其代码的某些地方,空出一点地方,好像是放一个小箱子一样,供其他开发者通过一些“小魔法”把一些功能放在那些地方,比如在输出页面 HTML 的时候,在一些软件作者认为有必要扩展的地方留一个小箱子,而其他开发者通过“这个软件文档”获取往那个箱子放东西的办法,之后写插件把自己写的功能放进去。
那么最终,系统启用插件,代码运行到箱子那里,就会把其他开发者做的那个功能也顺带运行。
这是最基础的理解,当然插件能做的事情还有很多,这个后续再说。今天我们来从基础开始,做一个小 emlog 插件 ---- 实现功能,后台编辑文章时,截取正文生成 xx 字摘要。
需要的知识基础是,入门级别的 HTML 、CSS 、JS、PHP。
emlog 系统的插件是怎么运行的?
样板程序 tips 解析
先看 emlog 系统自带的插件样板,小提示。
/content/plugins/tips/tips.php
<?php
/*
Plugin Name: 小贴士
Version: 2.0
Plugin URL:
Description: 这是世界上第一个emlog插件,它会在你的管理页面送上一句温馨的小提示。
Author: emlog官方
Author URL: https://www.emlog.net
*/
!defined('EMLOG_ROOT') && exit('access deined!');
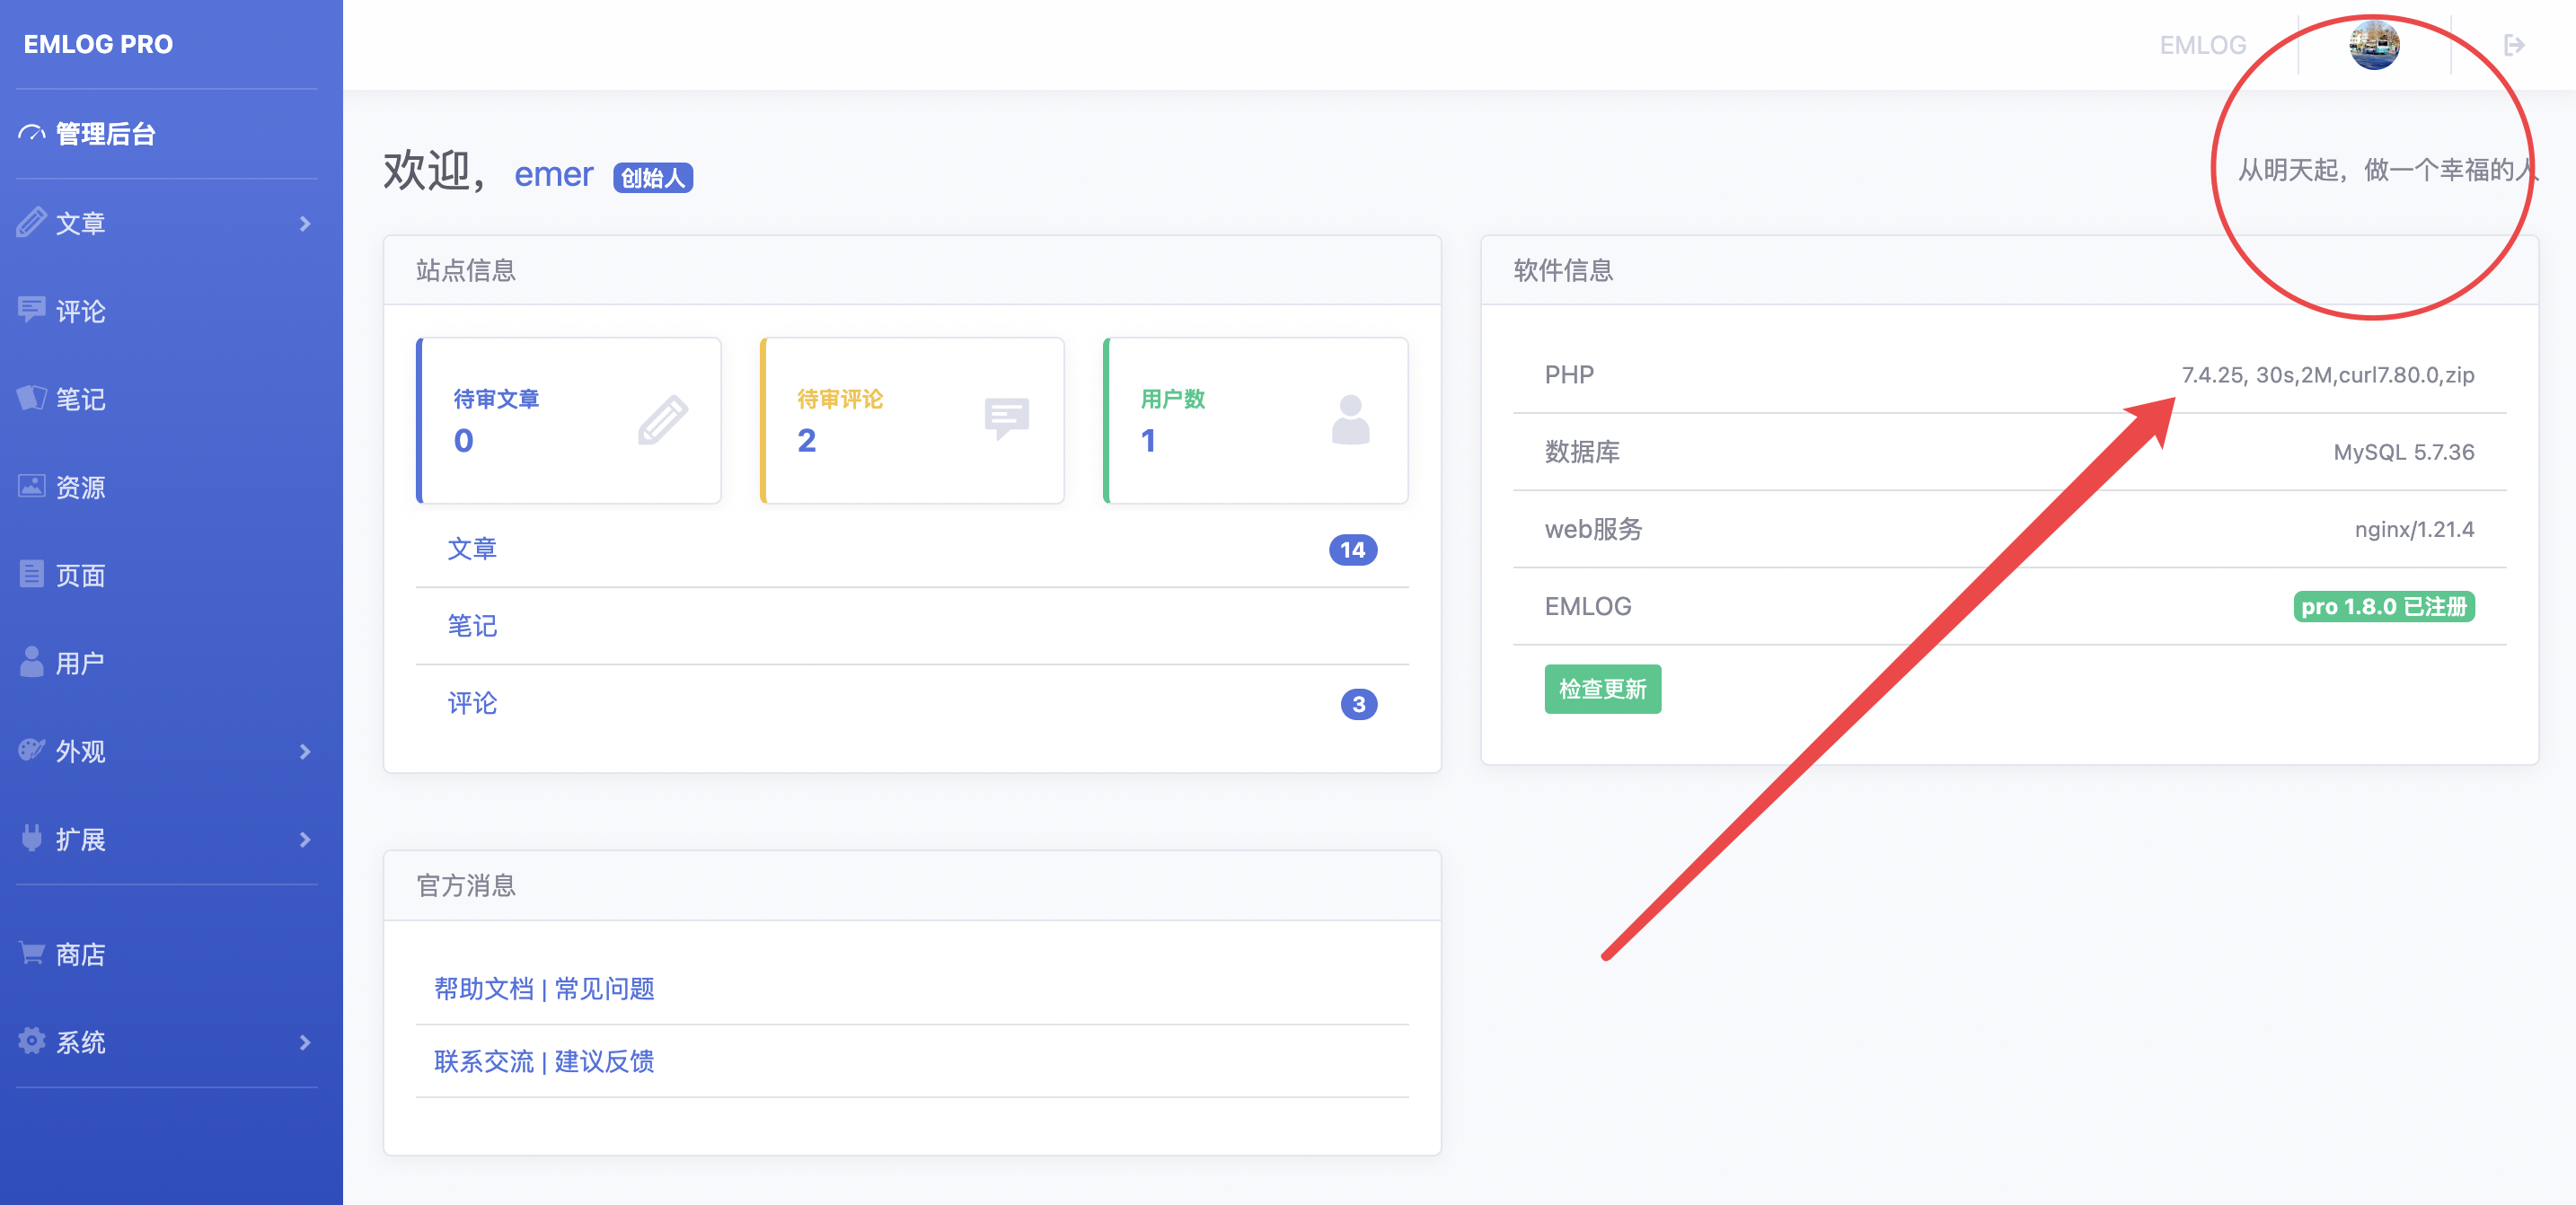
$array_tips = [
'为防文章丢失,emlog会在你书写文章的时候为你自动保存',
'你可以把你未写完的文章保存到草稿箱里',
'大尺寸的图片上传时会自动生成缩略图,从而加快页面加载速度',
'请关注后台首页的官方信息栏目,这里有最新的动态',
'你可以把图片嵌入到内容中,让你的文章图文并茂',
'你可以在写文章的时候为文章设置访问密码,只让你授予密码的人访问',
'emlog支持多人联合撰写',
'emlog支持自建页面,并且可以上传照片,为自己做一个图文并茂的自我介绍页吧',
'新建一个允许发表评论的页面,你会发现其实它还是一个简单的留言板',
'检查你的站点目录下是否存在安装文件:install.php,有的话请删除它',
'使用chrome浏览器,更好的体验emlog',
'从明天起,做一个幸福的人',
];
function tips() {
global $array_tips;
$i = mt_rand(0, count($array_tips) - 1);
$tip = $array_tips[$i];
echo "<div id=\"tip\"> $tip</div>";
}
addAction('adm_main_top', 'tips');
function tips_css() {
echo "<style type='text/css'>
#tip{
background:url(../content/plugins/tips/icon_tips.gif) no-repeat left 3px;
padding:3px 18px;
margin:5px 0px;
font-size:12px;
color:#999999;
}
</style>\n";
}
addAction('adm_head', 'tips_css');删去一些干扰内容,我们得到以下内容 ------ 代码的重点。
<?php
/*
Plugin Name: 小贴士
Version: 2.0
Plugin URL:
Description: 这是世界上第一个emlog插件,它会在你的管理页面送上一句温馨的小提示。
Author: emlog官方
Author URL: https://www.emlog.net
*/

!defined('EMLOG_ROOT') && exit('access deined!');

function tips() {
    echo "<div id=\"tip\"> 你好,我是一个插件!</div>";
}

addAction('adm_main_top', 'tips');
顶部注释信息
代码一共有五行。上面的注释有很多行。上面的注释会被 emlog 系统所识别,以此作为系统在后台的插件设置处各种说明的依据。像下图一样。

这个不必多说,自己的插件,照着修改即可。
上面空着没写的 plugin URL 是指作者的链接,各位可写上自己的网站外链,这个也会在 emlog 后台展示。
然后是后面的代码。
鉴定访问权限
!defined('EMLOG_ROOT') && exit('access deined!');这一行的代码表面意思是:如果找不到定义的常量 EMLOG_ROOT ,那么退出程序运行,并输出字符串 'access deined!'(拒绝访问)。
这一行的代码决定了,这个 PHP 文件(tips.php)只能由包含常量 EMLOG_ROOT 的文件引用下才能运行(几乎所有大规模软件的源码都是很多文件,以一定秩序嵌套引用,然后组成了一个完整的软件代码逻辑),直接访问它,类如 www.xxx.www/content/plugins/tips/tips.php 是不行的,因此保证了一些安全性。
当然我们也可以类比这个办法,设立属于我们插件的 常量。
比如我们在本目录下再建立一个文件,tips_word.php。
两个文件的内容分别改为如下内容。
-------------------------------------------------------------------------------------
tips.php
-------------------------------------------------------------------------------------

<?php
/*
Plugin Name: 小贴士
Version: 2.0
Plugin URL:
Description: 这是世界上第一个emlog插件,它会在你的管理页面送上一句温馨的小提示。
Author: emlog官方
Author URL: https://www.emlog.net
*/

!defined('EMLOG_ROOT') && exit('access deined!');

const TIPS_AAR = '';
require 'tips_word.php';

function tips() {
    echo tips_getWord();
}

addAction('adm_main_top', 'tips');

-------------------------------------------------------------------------------------
tips_word.php
-------------------------------------------------------------------------------------

<?php

!defined('TIPS_AAR') && exit('access deined!');

function tips_getWord(){
    return "从明天起,做一个幸福的人";
}
这样,我们的插件也有了这种“鉴定访问权限”的方式了。我们的插件如果大了的话,也可以使用这个方式来为我们的很多插件内的 PHP 文件鉴权了。
动作函数
那么上面代码内容的插件,启用后的显示效果如何呢?打开后台,字显示到下图所示的位置了。
为什么会这样呢?
addAction('adm_main_top', 'tips');看这行代码,是一个函数,add action(添加动作)。打开我们的 emlog 开发文档,我们可看到,有这行的解释。
https://www.emlog.net/docs/#/plugin
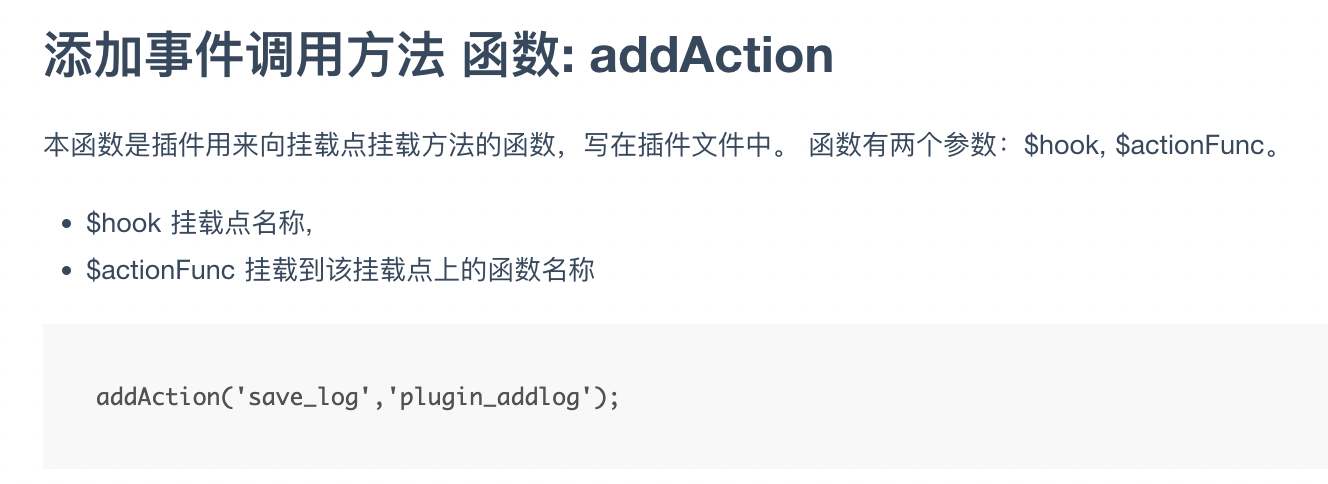

第一个参数,是我们要使用的挂载点(箱子),第二个参数就是我们要在这里添加的功能函数(也就是功能)。
显然,我们的功能(输出这句话,“从明天起,做一个幸福的人”),会在“后台首页顶部区域”执行。
这就是插件的运行原理。我们也可以扒一扒 emlog 的源码,在 admin/views/index.php 果真有这个“添加箱子”的代码。

开始制作我们的插件!
起名和内容策划
首先,起个名字,越短越好。。。还有简介,尽量保证在用眼瞪着看,不读,就能明白干什么的。
名字:一键生成摘要
简介:在文章编辑页,一键生成摘要。可自定义设置摘要字数(如 100 字)。
还有英文名,设置文件名用,clicksum, (one click to get the summery),所以叫 clicksum。
初始化开发环境
好,设置如下目录和文件,在我们的本地开发环境中的 /content/plugins/clicksum,和 tips 插件类似。
/clicksum
    |----clicksum.php     # 插件的主文件
    |----clicksum_setting.php     # 插件的后台设置
    |----clicksum_callback.php  # 插件初始化(可用于写入默认配置)
插件内容如下。
-------------------------------------------------------------------------------------
clicksum.php
-------------------------------------------------------------------------------------
<?php
/*
Plugin Name: 一键生成摘要
Version: 1.0
Plugin URL:
Description: 在文章编辑页,一键生成摘要。可自定义设置摘要字数(如 200 字)。
Author:
Author URL:
*/

!defined('EMLOG_ROOT') && exit('access deined!');

function clicksum_display() {
    echo "";
}

addAction('adm_writelog_head', 'c_display');

-------------------------------------------------------------------------------------
clicksum_setting.php
-------------------------------------------------------------------------------------
<?php
!defined('EMLOG_ROOT') && exit('error');

function plugin_setting_view(){
?>

<div>hi</div>

<?php } ?>

-------------------------------------------------------------------------------------
clicksum_callback.php
-------------------------------------------------------------------------------------
<?php
!defined('EMLOG_ROOT') && exit('error');
根据插件开发文档,插件的主文件名必须与插件的文件夹名一致。也难怪,不这样的话,谁知道执行哪个文件。所以,文件夹叫 clicksum ,PHP 文件也叫 clicksum。
根据文档,xxxx_setting.php 会作为插件的设置界面。这个后面再说。
我们选用的“箱子”是,adm_writelog_head,在编辑器上方显示,非常合适。
先实现功能。做插件,免不了阅读源码。不过还好,这个插件大概没有 PHP 太多事,纯粹网页效果,所以我们可以把 emlog 的 PHP 代码当成黑箱对待,先探讨一下这个插件前端怎么实现。
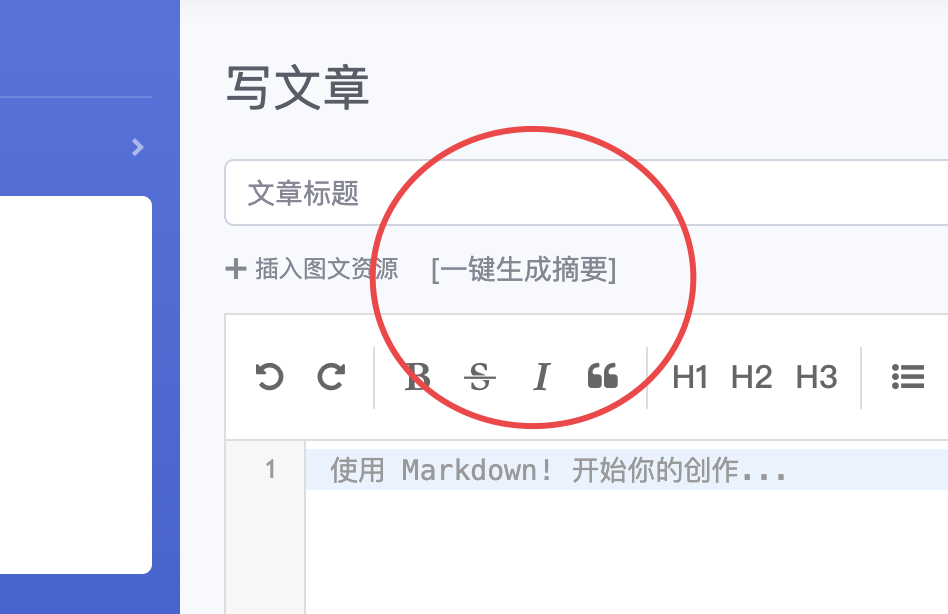
插件是这样的。用户会在文章摘要的地方,看到一个按钮,叫“一键生成摘要”,按下去,摘要编辑器里就自动写上摘要。
应注意,任何在公共空间里的变量、函数,都应以 xxx_ 为开头命名(xxx 是插件名),以防止系统内的代码产生冲突,造成系统崩溃。如 clicksum_display()
那么我们就开始向 clicksum_display 里填一个东西吧。
function clicksum_display() {
    echo "<button id='clicksum' class="btn btn-link">[一键生成摘要]</button>";
}
然后在后台的插件设置区激活它。

然后打开后台的文章编辑页面,会发现有了这个“按钮”了。
然后我们就可以给它添加动作了。这个使用 js 脚本就行。为了便于阅读,我们使用的是 PHP 中的 EOF 语法。
!defined('EMLOG_ROOT') && exit('access deined!');

function clicksum_display() {
    echo "<button id='clicksum' class='btn btn-Link'>[一键生成摘要]</button>";

    echo <<<EOF

        <script>
        </script>

EOF;
}

addAction('adm_writelog_head', 'c_display');
研究如何在编辑器插入内容
通过研究 emlog 我们可知道 emlog 默认使用的是叫 editor.md 的编辑器,通过查阅 editormd 官网的文档,我们可知道设置这个编辑器的内容可使用如下的方式来设置。
http://editor.md.ipandao.com/examples/set-get-replace-selection.html
var testEditormd; // 定义编辑器
$(function() {
testEditormd = editormd("test-editormd", { // 生成编辑器
width: "90%",
height: 640,
path : '../lib/'
});
});
testEditormd.setCursor({line:1, ch:2}); // 设置光标位置为 1 行 2 列
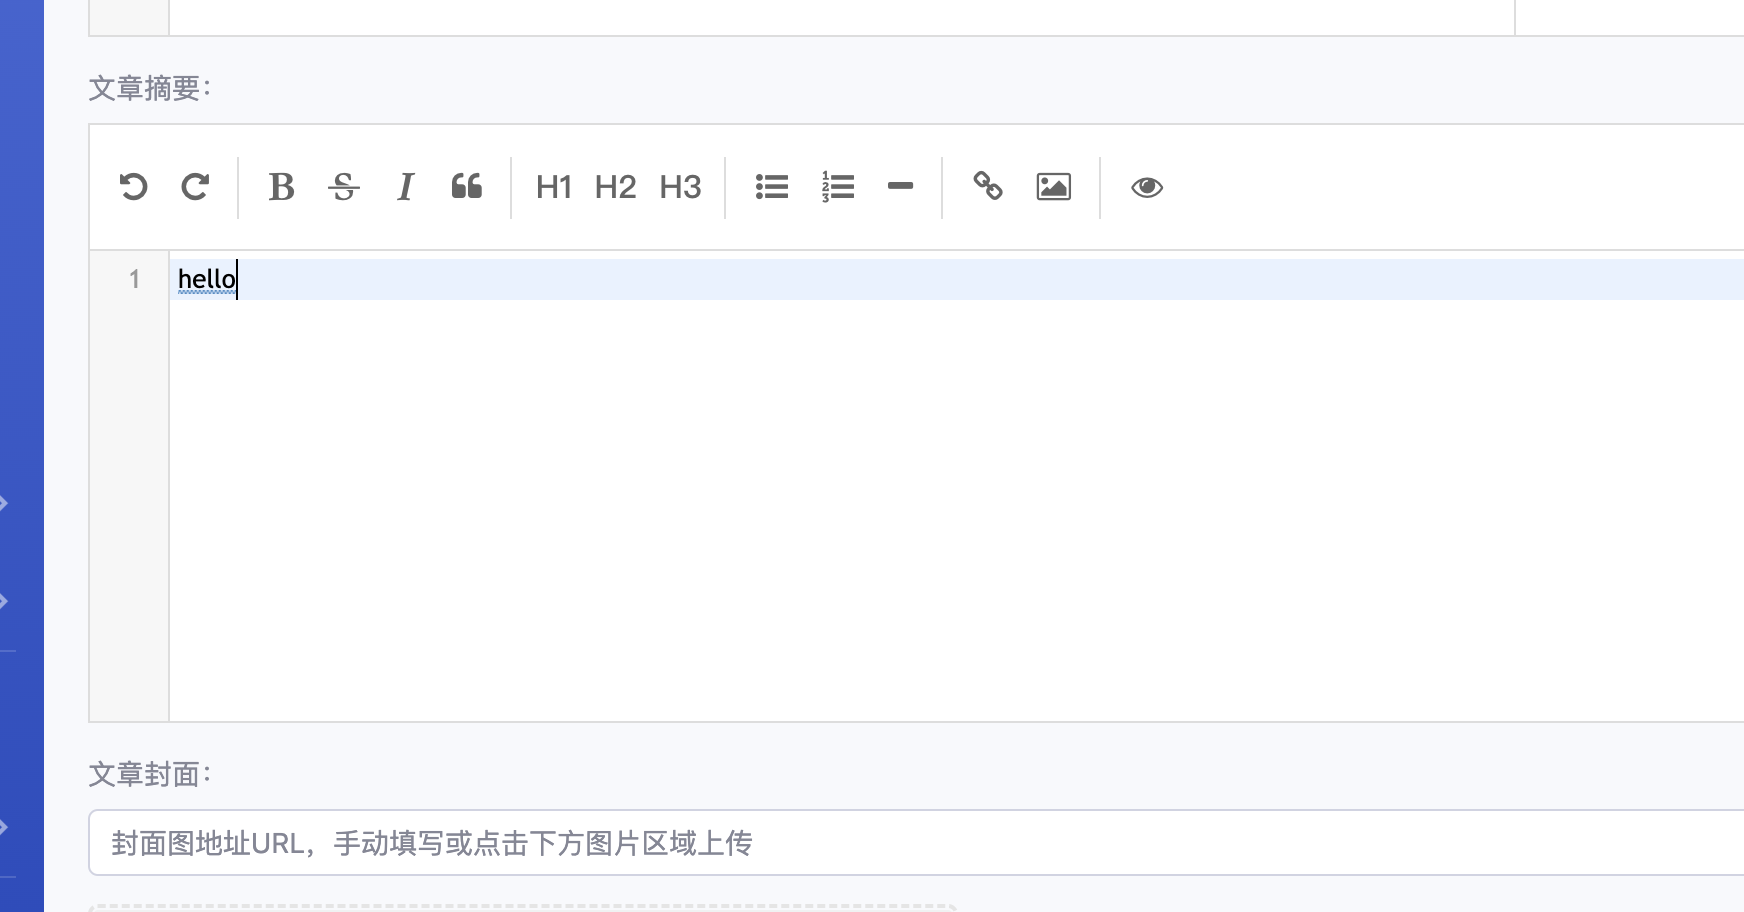
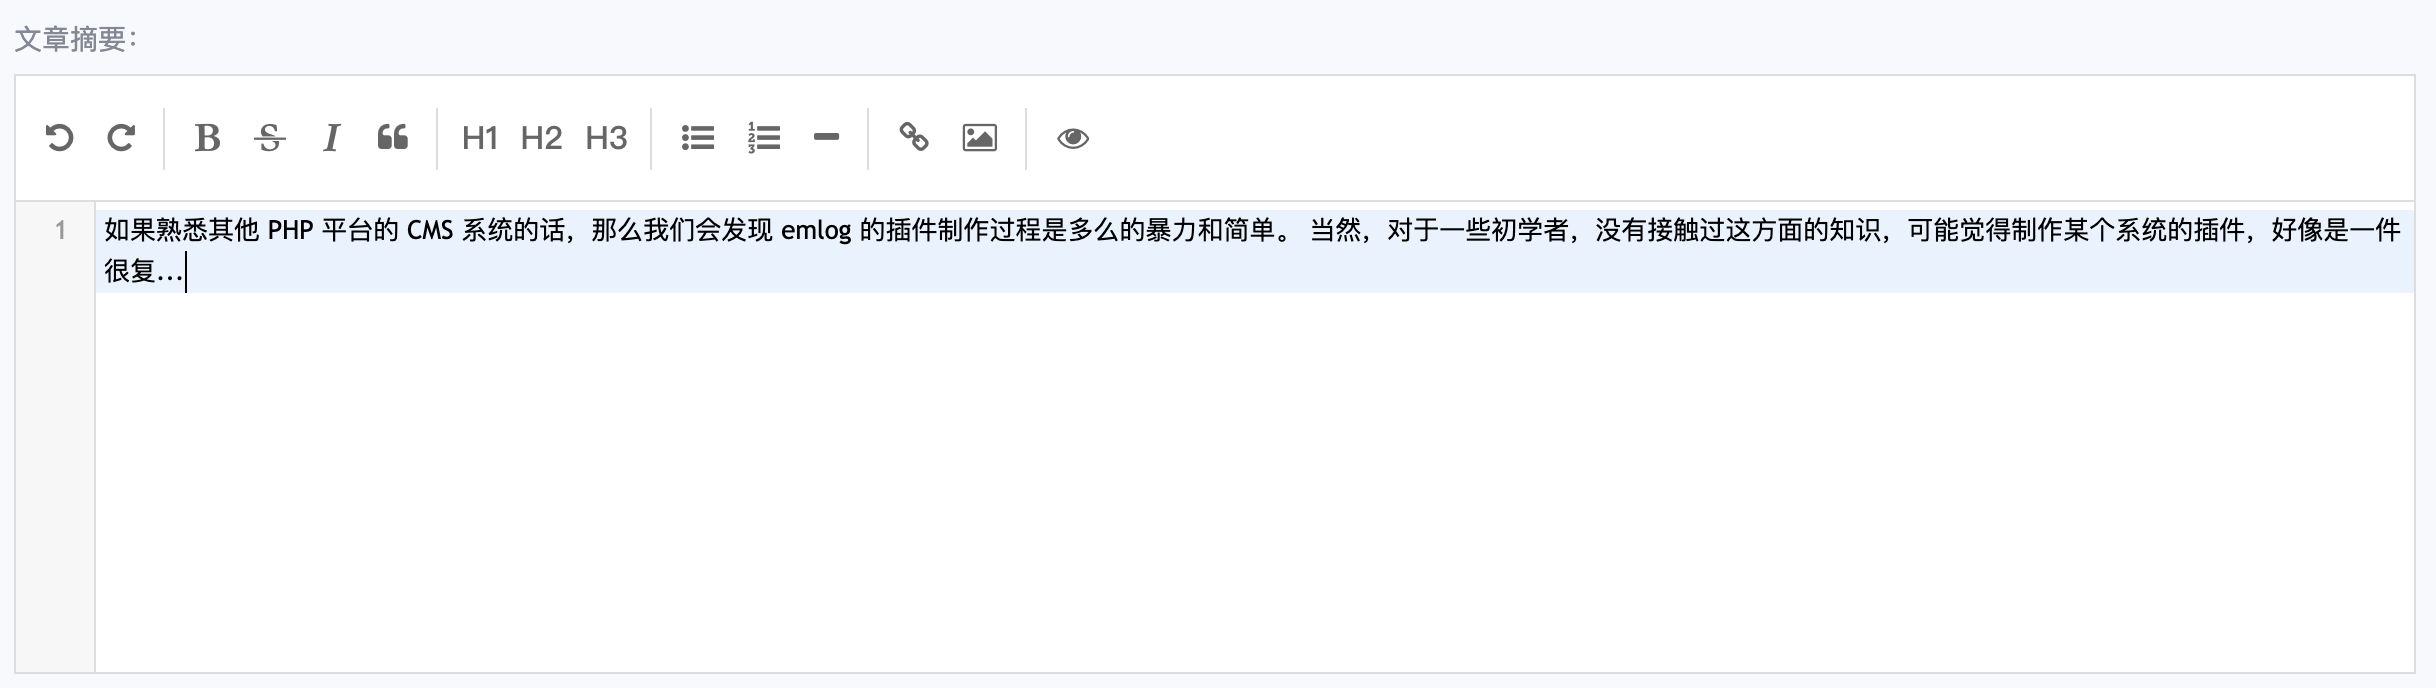
testEditormd.insertValue("????"); // 在光标位置插入内容“????”因此,我们可写这样的代码,向摘要编辑器里输入 hello world。
    echo <<<EOF
<script>
Editor_summary.setCursor({line:0, ch:0});  // 让光标放在最开始处
Editor_summary.insertValue("hello");  //  在光标位置插入内容“????”

</script>
EOF;
好,显示效果如下。现在我们就可以在插件里对各个编辑器为所欲为了!!!
首先我们要获取文章编辑器的内容。根据 editor.md 的官方文档,我们可以使用 .getPreviewedHTML() 函数来获取。当然,直接获取 class="editormd-preview-container" 的 html 也可以。
之后就是思考程序流水线了。我们获取的是 editor.md 的 html 源代码。那么我们可以设计下面这样的流水线来生成摘要了。
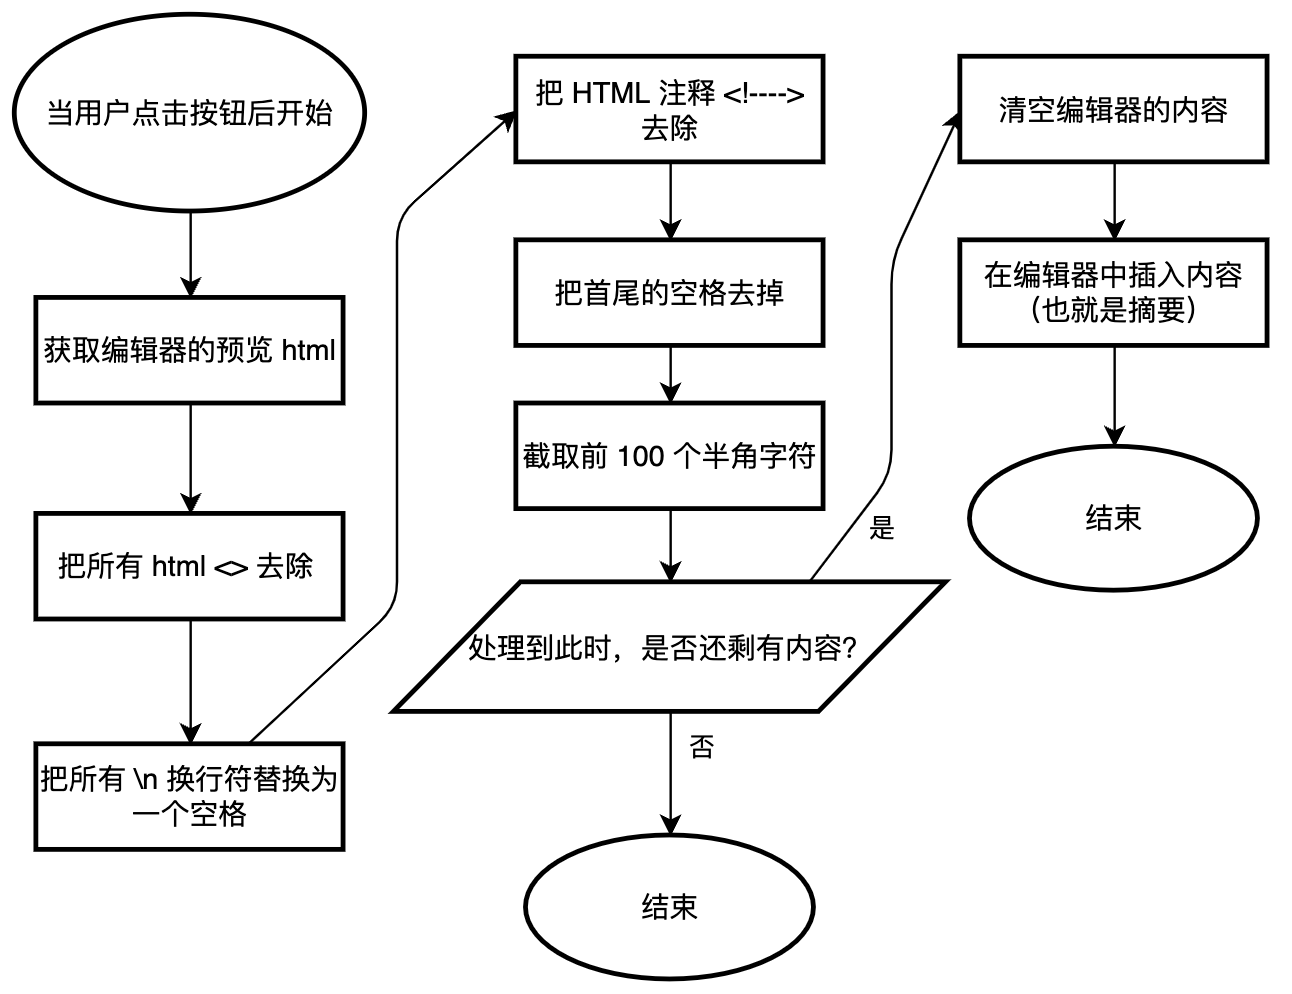
JavaScript 比较简单,就不多说了,如下述代码。
function clickSum(){
    const pattern1 = /<(\S*?)[^>]*>.*?/ig;
    const pattern2 = /\\n/ig;
    const pattern3 = /\`\\x3C!--.*-->/ig;
    const pattern4 = /^\s+/ig;
    const pattern5 = /\s+$/ig;

    let endText = "$clicksum_string";  // 摘要的结尾要加上的字符串
    const number = $clicksum_number;  // 截取的字符数

    let articleHtml = Editor.getPreviewedHTML()
    let articleText = articleHtml.replace(pattern1, "");  // 去除 html 的尖括号
    articleText = articleText.replace(pattern2, " ");  // 换行符变空格
    articleText = articleText.replace(pattern3, "");  // 去除 HTML
    articleText = articleText.replace(pattern4, "");  // 这两行去除首尾空格
    articleText = articleText.replace(pattern5, "");

    if(articleText.length > articleText.substring(0,number).length){
        articleText = articleText.substring(0,number);
    } else {
        endText = '';
    }

    if (articleText.length === 0 ) return  // 如果处理到此时,内容为空,退出

    /* 清空编辑器里之前的内容 */
    Editor_summary.setCursor({line:0, ch:0});  // 光标放在开头
    Editor_summary.setSelection({line:0, ch:0}, {line:(999*999*999), ch:(999*999*999)});  // 内容全选
    Editor_summary.replaceSelection("");  // 清空

    Editor_summary.insertValue(articleText + endText);

    return
}

clicksum.addEventListener("click", function(){
    clickSum();
})
效果还不赖
这样就初步完成了。不过我们还要扩展一下,添加如下四个功能。
- 后台可设置截取的字符数,比如 200、300
- 后台可设置是否在提交时自动截取
- 后台可设置摘要后的添加的字符串内容(即更改 ... 为其他内容)
- 后台可设置是否在生成摘要后,让编辑器预览。
插件后台设置
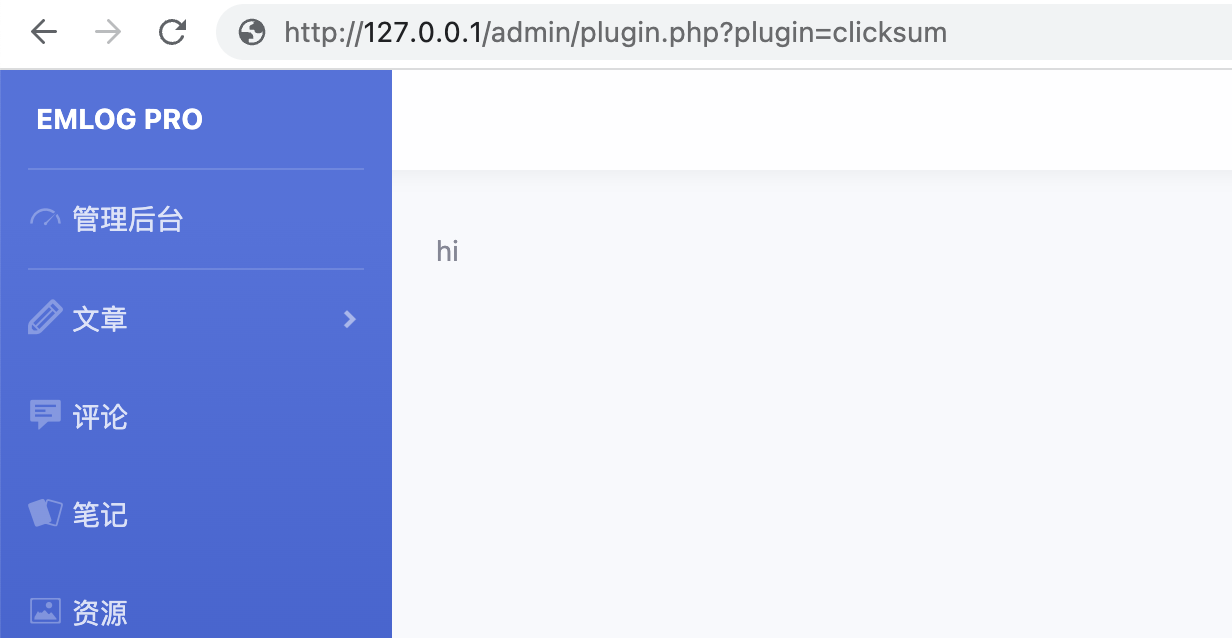
根据 emlog 开发文档,插件设置的代码需要在文件 xxx_setting.php 中定义。且代码中的执行入口是函数 plugin_setting_view() ,如我们之前定义的代码。
我们可打开我们本插件的后台,如下图所示。
然后把 clicksum_setting.php 中的改成如下。
<?php
!defined('EMLOG_ROOT') && exit('error');
function plugin_setting_view(){
?>
<form action="plugin.php?plugin=clicksum&act=save" method="post" name="input">
<div>
<label for="input1">提交文章时自动提交摘要:</label>
<input type="radio" name="autogen" value="y" />是
<input type="radio" name="autogen" value="n" />否
</div>
<div>
<label for="input2">生成摘要后,编辑器预览:</label>
<input type="radio" name="autopre" value="y" />是
<input type="radio" name="autopre" value="n" />否
</div>
<div>
<label for="input3">截取的字符数:</label>
<input type="number" id="input3" name="number" required />
</div>
<div>
<label for="input4">摘要后接字符串:</label>
<input type="text" id="input4" name="string" required />
</div>
<input type="submit" value="保存" />
<form>
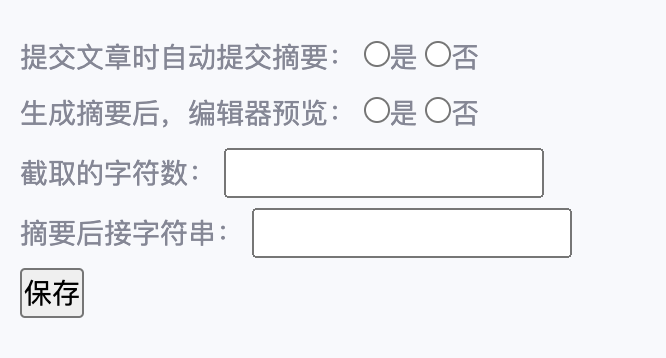
<?php } ?>后台“仪表盘”初具雏形。
获取数据
我们的 HTML 表单使用的 post 方法来发送数据,现在我们在 PHP 中获取。
function plugin_setting_view(){

    $act = isset($_G E T['act']) ? addslashes($_G E T['act']) : '';

    if($act == "save") {
        $getConfig = [  // 获取 post 得来的数据
            'autogen'   => isset($_P O S T['autogen']) ? addslashes($_P O S T['autogen']) : 'n',
            'autopre'   => isset($_P O S T['autopre']) ? addslashes($_P O S T['autopre']) : 'n',
            'number'    => isset($_P O S T['number']) ? addslashes($_P O S T['number']) : '100',
            'string'    => isset($_P O S T['string']) ? addslashes($_P O S T['string']) : '...'
        ];
    }
当我们的 get 请求里有 act=save 时,就来获取数据。如上图所示,把数据储存到 $getConfig 这个对象里。
超级方便的 emlog Storage
当前,数据只是如同存到数组里了,怎么样能存储到数据库里才是关键。在过去的 emlog 版本中,我们需要自己写本地储存参数的程序,像什么文本,JSON 文件等等,如果要存储到数据库中,又害怕影响数据表。
Pro 版本以后,我们可以使用 emlog Storage(emlog 插件的数据存储器)来存储我们的插件数据了,直接和 emlog 的数据库表融为一体,方便很多。
根据 emlog 的开发手册,我们可以按以下方式来存储。
储存数据

$plugin_storage = Storage::getInstance('plugin_name');//使用插件的英文名称初始化一个存储实例
$plugin_storage->setValue('key', 'xxxxxx'); // 设置key的值为 xxxxxx

读取数据

$plugin_storage = Storage::getInstance('plugin_name'); //使用插件的英文名称初始化一个存储实例
$ak = $plugin_storage->getValue('key'); // 读取key值
因此,我们可在我们的代码中使用这个功能来将我们的配置储存到 emlog 的数据表里。
应注意,任何用户输入的数据都必须必须必须必须必须必须必须使用 addslashes()_ 等措施来进行 HTML 过滤,否则将会带来极大的安全隐患!
把下面代码中的 G E T、P O S T 中间的空格删去。(因为宝塔的监控缘故,不加空格,无法发出文章)
$clicksum_storage = Storage::getInstance('plugin_clicksum');  // 初始化 emlog 插件存储

function plugin_setting_view(){
    global $clicksum_storage;

    $act = isset($_G E T['act']) ? addslashes($_G E T['act']) : '';

    if($act == "save") {
        $getConfig = [  // 获取 post 得来的数据
            'autogen'   => isset($_P O S T['autogen']) ? addslashes($_P O S T['autogen']) : 'n',
            'autopre'   => isset($_P O S T['autopre']) ? addslashes($_P O S T['autopre']) : 'n',
            'number'    => isset($_P O S T['number']) ? addslashes($_P O S T['number']) : '100',
            'string'    => isset($_P O S T['string']) ? addslashes($_P O S T['string']) : '...'
        ];

        $clicksum_storage->setValue('autogen', $getConfig['autogen']);
        $clicksum_storage->setValue('autopre', $getConfig['autopre']);
        $clicksum_storage->setValue('number', $getConfig['number']);
        $clicksum_storage->setValue('string', $getConfig['string']);
    }
当然,系统默认是隐藏 PHP 报错信息的,如果想开启,可在我们对应正在编写操作的 PHP 文件最上头写上 error_reporting(E_ALL); 。文章中的例子已省略。
后台显示与配置数据库同步
然后建立几个函数,通过简单的判断,来控制仪表盘的数据变动,使其与 $clicksum_storage 一样。
- autogen_check():提交文章时自动提交摘要
- autopre_check():生成摘要后,编辑器预览
- number_content():截取的字符数
- string_content():摘要后接字符串
最终仪表盘就完工了!
<?php
!defined('EMLOG_ROOT') && exit('error');

$clicksum_storage = Storage::getInstance('plugin_clicksum');

function plugin_setting_view(){
    global $clicksum_storage;

    $act = isset($_G E T['act']) ? addslashes($_G E T['act']) : '';

    if($act == "save") {
        $getConfig = [  // 获取 post 得来的数据
            'autogen'   => isset($_P O S T['autogen']) ? addslashes($_P O S T['autogen']) : 'n',
            'autopre'   => isset($_P O S T['autopre']) ? addslashes($_P O S T['autopre']) : 'n',
            'number'    => isset($_P O S T['number']) ? addslashes($_P O S T['number']) : '100',
            'string'    => isset($_P O S T['string']) ? addslashes($_P O S T['string']) : '...'
        ];

        $clicksum_storage->setValue('autogen', $getConfig['autogen']);
        $clicksum_storage->setValue('autopre', $getConfig['autopre']);
        $clicksum_storage->setValue('number', $getConfig['number']);
        $clicksum_storage->setValue('string', $getConfig['string']);
    }

    function autogen_check($key){
        global $clicksum_storage;

        if ($clicksum_storage->getValue('autogen') ==  $key){
            return "checked";
        }
    }

    function autopre_check($key){
        global $clicksum_storage;

        if ($clicksum_storage->getValue('autopre') ==  $key){
            return "checked";
        }
    }

    function number_content(){
        global $clicksum_storage;

        return $clicksum_storage->getValue('number');
    }

    function string_content(){
        global $clicksum_storage;

        return $clicksum_storage->getValue('string');
    }

?>

<form action="plugin.php?plugin=clicksum&act=save" method="post" name="input">
    <div>
        <label for="input1">提交文章时自动提交摘要:</label>
        <input type="radio" name="autogen" value="y" <?= autogen_check("y") ?> />是
        <input type="radio" name="autogen" value="n" <?= autogen_check("n") ?> />否
    </div>
    <div>
        <label for="input2">生成摘要后,编辑器预览:</label>
        <input type="radio" name="autopre" value="y" <?= autopre_check("y") ?> />是
        <input type="radio" name="autopre" value="n" <?= autopre_check("n") ?> />否
    </div>
    <div>
        <label for="input3">截取的字符数:</label>
        <input type="number" id="input3" name="number" value="<?= number_content() ?>" required />
    </div>
    <div>
        <label for="input4">摘要后接字符串:</label>
        <input type="text" id="input4" name="string" value="<?= string_content() ?>"required />
    </div>
    <input type="submit" value="保存" />
<form>

<?php } ?>
文章提交时自动生成摘要
现在实现第一个功能。其实逻辑很简单,就是在点击文章提交按钮时来执行一遍函数。因为 JavaScript 会优先于 form 表单提交动作。
首先在 clicksum.php 开头添加 emlog storage。
$clicksum_storage = Storage::getInstance('plugin_clicksum');然后在 clicksum.php 文件下部加上
function clicksum_autoSum(){
    echo <<<EOF

<script>
document.querySelector("#post_button [type='submit']").addEventListener("click", function(){
    clickSum();
});
</script>

EOF;
}

if($clicksum_storage->getValue('autogen') == 'y'){
    addAction('adm_footer', 'clicksum_autoSum');
}
其他的三个功能更好设置。也是类似原理,这里不再讲解。最终 clicksum.php 的内容如下所示。
<?php
/*
Plugin Name: 一键生成摘要
Version: 1.0
Plugin URL:
Description: 在文章编辑页,一键生成摘要。可自定义设置摘要字数(如 200 字)。
Author:
Author URL:
*/

!defined('EMLOG_ROOT') && exit('access deined!');

$clicksum_storage = Storage::getInstance('plugin_clicksum');  // 初始化 emlog 插件存储

function clicksum_display() {

    global $clicksum_storage;

    $clicksum_number = $clicksum_storage->getValue('number');
    $clicksum_string = $clicksum_storage->getValue('string');
    $clicksum_preScript = ($clicksum_storage->getValue('autopre') == 'y') ? 'Editor_summary.watch()' :'';

    echo "<a id='clicksum' class='btn btn-Link'>[一键生成摘要]</a>";

    echo <<<EOF

<script>
function clickSum(){
    const pattern1 = /<(\S*?)[^>]*>.*?/ig;
    const pattern2 = /\\n/ig;
    const pattern3 = /\`\\x3C!--.*-->/ig;
    const pattern4 = /^\s+/ig;
    const pattern5 = /\s+$/ig;

    let endText = "$clicksum_string";  // 摘要的结尾要加上的字符串
    const number = $clicksum_number;  // 截取的字符数

    let articleHtml = Editor.getPreviewedHTML()
    let articleText = articleHtml.replace(pattern1, "");  // 去除 html 的尖括号
    articleText = articleText.replace(pattern2, " ");  // 换行符变空格
    articleText = articleText.replace(pattern3, "");  // 去除 HTML
    articleText = articleText.replace(pattern4, "");  // 这两行去除首尾空格
    articleText = articleText.replace(pattern5, "");

    if(articleText.length > articleText.substring(0,number).length){
        articleText = articleText.substring(0,number);
    } else {
        endText = '';
    }

    if (articleText.length === 0 ) return  // 如果处理到此时,内容为空,退出

    /* 清空编辑器里之前的内容 */
    Editor_summary.setCursor({line:0, ch:0});  // 光标放在开头
    Editor_summary.setSelection({line:0, ch:0}, {line:(999*999*999), ch:(999*999*999)});  // 内容全选
    Editor_summary.replaceSelection("");  // 清空

    Editor_summary.insertValue(articleText + endText);

    $clicksum_preScript

    return
}

clicksum.addEventListener("click", function(){
    clickSum();
})
</script>

EOF;
}

addAction('adm_writelog_head', 'clicksum_display');

// 在发布文章时自动生成摘要

function clicksum_autoSum(){
    echo <<<EOF

<script>
document.querySelector("#post_button [type='submit']").addEventListener("click", function(){
    clickSum();
});
</script>

EOF;
}

if($clicksum_storage->getValue('autogen') == 'y'){
    addAction('adm_footer', 'clicksum_autoSum');
}
安装插件时设置默认值
现在有一个问题,插件刚开始安装时,是没有初始内容的。可能会有报错的风险,所以需要在插件激活,但还未启用时,进行初始化,也就是激活插件的那刻向 emlog Stroage 中写入默认配置。
在 emlog 开发中有如下说明。
插件的激活与关闭 在emlog后台的插件管理中,点击每个插件后的状态按钮即可激活/关闭插件。 自emlog4.0.0起增加激活和关闭插件函数,来完成激活和关闭时的一些初始化工作。 如果插件需要,可以给插件增加 plugin_callback.php 文件,其中包含两个函数:
- callback_init()为插件激活时调用
- callback_rm()为插件关闭时调用
因此,我们在 clicksum_callback.php 中写入如下内容。
<?php
!defined('EMLOG_ROOT') && exit('error');

function callback_init() {
    $clicksum_storage = Storage::getInstance('plugin_clicksum');

    $clicksum_storage->setValue('autogen', 'n');
    $clicksum_storage->setValue('autopre', 'n');
    $clicksum_storage->setValue('number', '100');
    $clicksum_storage->setValue('string', '...');
}
这样在我们激活插件的那一刻,就自动写入默认配置了。
现在我们的插件已制作完毕。打包成 clicksum.zip 就可以分享了!
不过 plugin_setting_view() 可以替代了 plugin_setting(),用 plugin_setting() 其实还更麻烦一点。/admin/plugin.php 里面有写着逻辑代码。
下面是一个等价关系:
【把下面代码中的 G E T、P O S T 中间的空格删去。(因为宝塔的监控缘故,不加空格,无法发出评论)】
function plugin_setting_view(){
$action = isset($_G E T['action']) ? addslashes($_G E T['action']) : '';
if ($action == 'setting') {
if (!empty($_P O S T)) {
// ...获取数据和把数据写入到数据库或其他地方的操作
}
}
}
/* 差不多等价于 */
function plugin_setting(){
// ...获取数据和把数据写入到数据库或其他地方的操作
}
当然,后者的不同之处是,执行了“获取数据和把数据写入到数据库或其他地方的操作” 后会跳转到一个地址,比如 http://localhost/emlogpro/admin/plugin.php?plugin=clicksum&setting=1,而如果 插件_setting.php 不存在 plugin_setting() 或 没有 POST 数据(其实浏览器直接访问 http://localhost/emlogpro/admin/plugin.php?plugin=clicksum&action=setting)或 plugin_setting() 最后返回 false,则会跳转到如 http://localhost/emlogpro/admin/plugin.php?plugin=clicksum&error=1 这个地址。
如果嫌上面这个逻辑有点麻烦的话,可以直接在 plugin_setting_view() 里面按照自己喜欢的方式来写获取数据和写入数据的业务代码。
